Prism is a one page premium WordPress theme for creating websites like restaurant, business, portfolio and any kind of website you can think of.
It is very easy to use, setup and customize WordPress theme with lots of exciting and useful features like:
- One page design
- Support for WooCommerce.
- Multiple color schemes.
- Testimonial slider
- Call to action button
You can see full feature list from here.
Installing Prism Theme
First you need to purchase Prism theme. After purchasing the theme upload the .zip file and install the theme. For more details check out our previous post on how to install theme on WordPress.
When you install the theme, it is loaded with the sample content and your site exactly looks like a Demo site. Activate the theme.
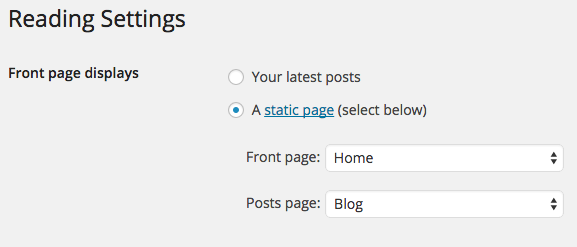
Setting a Static Front Page
Prism uses Static Front page option for displaying the content and widgets of home page of your site.
- Go to Pages >> Add New. Create “Home” Page and publish it.
- Create another page “Blog” and publish it.
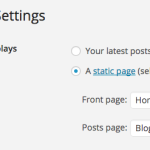
- Go to Settings >> Reading panel.
- Set Front page displays to a static page.
- Select Home front page and Blog as posts page and save the changes.
Customizing Prism
Once you setup the static front page, you can use Theme Customizer to update content and styling easily.
Prism comes with unique live customization feature which makes it easy to setup the content.
Setting up Site title, tagline and Header image
Enter the title and tagline of site that suits your business identity or add logo of your business in Header image section.
Setting up Navigation and One page navigation
Select navigation you want on your website. If you want to disable One page navigation, you can do it by click on Disable One page navigation.
Setting up Color Scheme

Prism comes with 8 color options. Select the color that suits your business identity. The theme has two background color scheme option: Light and Dark. Select the one that looks perfect on your site.
Setting up Home Slider
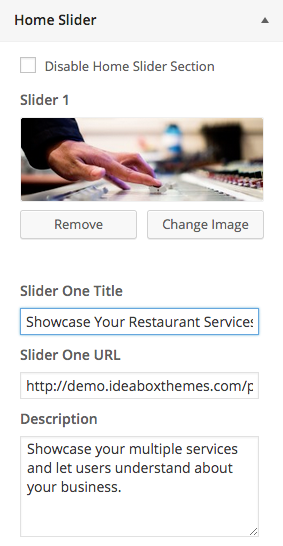
- Select image you want to add in your slider.
- Select the title and URL (optional).
- Add description to that image.
Prism allows you to add maximum 5 images in slider to showcase your products.
Setting up Home Featured Settings

- Enter the section title and menu title defined under Home Featured Setting.
- Select the image.
- Enter the title, Description, Link text and Link URL.
Prism allows you to add maximum 4 home featured area to showcase your services and products.
Setting up Featured Posts
Enter the section title, menu title and number of posts to display on the home page of your website. Select posts category wise (optional).
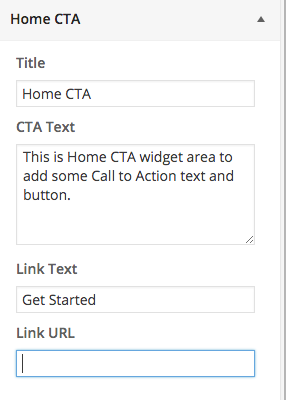
Setting up Home CTA
Enter CTA text, Link Text and Link URL to provoke your customers. If you don’t want this section on your website, click on Disable CTA.
Setting up Testimonial Settings and Slider
- Enter the section title and menu title defined under Testimonial settings.
- Add image and description under Testimonial Slider section.
This theme allows you to add maximum 3 testimonials in slider.
Setting up Contact Form
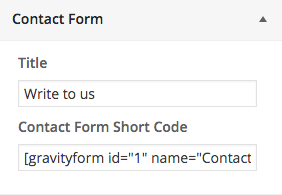
- Enter the title of section you want to display on your home page.
- Copy and Paste the shortcode that is generated when you created the contact form.
Setting up Home map
- Create a Google map of your corresponding address.
- Add iframe code in Home map section.
Also Read: How to create custom Google map?
Setting up Contact Details
- Enter the title of this section.
- Enter phone number, address and E-mail address.
Setting up Footer widget and Footer text
Prism has four column Footer Widget section where you can add recent comments, about section and many more.
Enter the copyright text in the Footer text section.
Setting up WooCommerce website
Prism WordPress theme is integrated with WooCommerce plugin. So you can easily build any e-commerce website by installing the plugin.
Once you’re done click on Save and Publish Button.
If you’ve got any queries related to theme or above article, feel free to ask via our support forum or comment section below.
More interesting articles
- How To Create A Business Website With WordPress - Superb Theme
- How To: Setup A Website To Boost E-mail Signups With SmartList WordPress Theme
 How To Setup Webify WordPress Theme
- Superb WordPress theme for Hotels and Restaurants
- How To Build A Girlish Website With Garnish WordPress Theme
- Prism One Page WordPress Theme